HANDS ON HALT AND HASS
by Chris Peterson from ACS Industrie
This article is meant to give reminders to point out a few new things and to help you to make sure that you get the best out of your testing. It should be helpful to novice and expert alike.
It covers the time of tests, good practices, mistakes to avoid, and lots of real life experiences.
The basics
The concept behind HALT is pretty simple. You start with single environments and step stress a test item until you find a failure.
Many people know the theory, then they need to fix the problem and start testing again. However, one step is so simple that people often forget about it. Understand the failure. Do failure analysis, and really understand what happened. Here is a list of questions you can ask yourself:
- What stress were you using? (heat, cold, vibration, power cycling, etc.)
- What level did you see the failure at?
- How far into the test were you? (How much time had passed?)
- Was the product in a basically finished configuration, or just slapped together for the test?
This last point is not facetious - I have seen newly complete designs put together very sloppily just to get a unit ready for test. When I have asked the design engineer in charge if it is in its final configuration, they will tell me "no, that this is only the test configuration". This may be tempting to do but can give misleading failure data.
Accelerated testing
Because HALT is highly accelerated, there is a tendency to try to accelerate the test even more. Let's look at some common tests and the actual time needed. We'll use a few common assumptions for each test.
The starting temperature will be 25°C, a figure that is close to room temperature and stabilize. For the times given we will pretend that no failure is found just to see the maximum time needed to go to the chamber maximum.
Cold test: Starting at 25°C we will take 1 minute to drop 10°C, then hold for 10 minutes. This will continue to -95°C, then drop 5°C to the chamber minimum temperature of -100°C. Taking five minutes to heat back up to 25°C and holding for 10 minutes to make sure that both the chamber and the test item warm back up we have just taken 160 minutes.
Heat test: I recommend 5°C steps when you get within 10°C of expected melting points and moving more slowly from that point, but the example is based upon simply stepping up to the chamber high temperature limit.
Vibration test: Many HALT chambers can reach 60 gs. Assuming that you start at 3 gs and increase by 3 gs at a time, giving 1 minute for the ramp and 10 minutes for each dwell, this gives a total of 220 minutes. (Remember that for the vibration only test that the chamber temperature should be at approximately 25°C throughout the entire test.)
Now, keep in mind that these figures bare based on no failures found. It would be an extremely rare case that a single product could make it through all three of these tests without a single problem.
How failure changes things
If you have a failure you should stop the test in most cases (unless there is an intermittent failure and you are waiting for it to be a hard failure) and figure out exactly what is going on. Sometimes the fix is as easy as tightening a loose screw during a vibration test. In other cases the failure analysis may be quite lengthy.
It is standard for this testing that if you see a failure that you diminish the stress by one step, see if the failure goes away, and if it does raise the stress again. Does the failure happen at the same point? You'll find that in some cases it will, in others it will not. I have seen many test items that can go up another step before you see the same failure, as if it is being conditioned during the test.
I did some work with a customer once who had a circuit card with a transducer that would shut the board down at 125°C. What we found was that something on the board was actually shutting it down at 82.5°C - consistently. We would hack down to 80°C, everything would work well, then raise the temperature to 85°C and every single time when the board hit 82.5°C it would shut down. The big problem was that they had no clue which component was doing it. Time to go back to the manufacturer's data sheets.
So, for timing, a failure does not bring an immediate stop to a test but makes it time to play around it see if the problem is reproducible.
Combined environments
Heat and cold, though both thermal, are actually separate environments. The simplest of the combined environmental tests is doing temperature swings.
One rule of thumb is common usage is to use five thermal swings. Using data learned from the cold only and heat only tests, build your profile from room temperature. Remember that you are not looking for exactly the same failure but a new one based on this new stress. Lowering the stress by 10°C allows for this.
Staring again at 25°C you would go high temperature failure -10°C, dwell for 10 minutes, then low temp failure +10°C, dwell for 10 minutes, etc. The final step would be from your cold temperature back up to 25°C. Assuming an initial dwell of 2 minutes, 2 minutes for the first ramp, 4 minutes for all full range ramps, 2 minutes for the final ramp and a final 10 minute dwell we dome up with a total of 152 minutes. Again this is assuming no failures found.
Statistically rapid thermal cycling causes the fewest number of failures. However, about 4% of failures are found only during this particular stress so it is an important weapon in the arsenal in the fight for reliability.
Maybe the profile that people think of first when using HALT is thermal swings with vibration. The thermal profile is very similar to the one above but with the addition of graduated steps of vibration. The timing would end up being very similar.
The forgotten test
There is another test in the HALT set that I like to use, but I find that a lot of people skip it because of time constraints or not understanding its power. The test is a combination of a single temperature with vibration. The idea behind it is to use the temperature of most concern - whether heat or cold - with vibration - either pulsed on and off or at a constant value. For instance, you could go to your high temperature extreme value (from your heat only test) -10°C, then turn vibration on for 5 minutes, off for 5 minutes, at 80% of the failure level (from the vibration only test). The reason for this is to see if the combination of a single thermal environment with vibration would cause either a similar failure to those found with the temperature only and vibration only tests, or if the combination brings out a new failure. This test can normally be run in about 90 minutes.
Total time
These six tests should be able to be run within 3 days. Of course, failures will change that timing. Depending upon the solution to the problem the testing may be able to be resumed immediately, or it may take a time consuming solution. The easiest thing to do is to use a second sample - if available - to make sure that you did not just have a weak representative.
Common mistakes
Even well intentioned, well informed people can sometimes make mistakes during testing. When doing HALT testing, keep these basic points in mind:
- You are testing the product, not the chamber, so measure the product. This means both for temperature and vibration (if it is possible to mount the accelerometer to the product)
- HALT testing needs a babysitter. Monitoring equipment will not pick up every failure, but someone should also be taking time to look through the chamber window once in awhile.
- Don't build a product specifically to "pass" the test with the idea that the production items will not need to be as strong. Keep in mind that HALT is a discovery test, not a pass/fail test. You are actually hoping to find a failure so that you can learn from it.
- There is no one perfect way to do a HALT test. The important part is that you get a greater understanding of your product. Use your experience along with general guidelines and you will get what you need from the testing.
- Repetitive shock is not a drop test. Remember not to expect things from the testing that are physically impossible.
Here is a list of mistakes that I have seen customers make:
- Putting silicone sheet on the vibration table to help absorb the vibration so that the product does not get scratched, and then wondering why the vibration levels seem so low. (Remember that you will almost never ship a product that has gone through HALT. It does not matter if the paint gets scratched.)
- Putting the thermocouple in the air instead of on the product. The chamber air can change at rates as fast as 100°C/minute, much faster than the product. Having the sensor in the air will make it look like the chamber cannot control, when what really should be controlled is the product. If the sensor is too far from the product the response could actually be very different than on the chamber air.
- Using wires or cables for monitoring or powering the product under test that cannot hold up to the temperature extremes in the chamber. Either use high temperature cabling or insulate it to protect it.
- Not monitoring the product during the test. One company found that 50% of the failures that they found were intermittent problems during the test that never got picked up doing a bench test before or after placement in the chamber.
- Ignoring a failure in the chamber because the stresses seem unrepresentative of real life. Remember that the tests are purposely accelerated. The problem could show up at lower stresses over a longer period of time. (The major exception to this is melting.)
- Forgetting to turn off powered equipment at the end of a test. I had a customer who finished a test, turned off the chamber, and forgot to turn off the self heating boards. They came back the next day to find close to $300,000 worth of destroyed boards.
- Opening the door if there is a fire. I was amazed to find out how many customers purposely start fires inside their chambers. Keep in mind that nitrogen displaces oxygen in the air and if a fire does start, can be used easily as a fire extinguisher. One customer opened the door thinking to put out a small fire in a magnesium fixture he was using. The fire flashed up the exhaust pipe and onto the roof doing a great deal of damage to the building.
Understanding margins
Even well intentioned, well informed people can sometimes make mistakes during testing. When doing HALT testing, keep these basic points in mind:
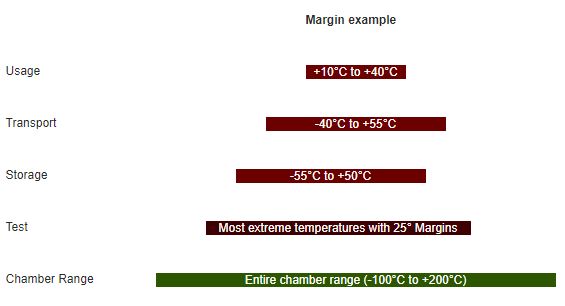
The temperatures expected for usage, transport and storage are under each corresponding bar. Transportation can actually have a slightly more severe range than storage - especially for products that may be shipped all around the world - as many office products are.
The main point is not the length of each bar, but rather the fact that the test range needs to go beyond the most extreme temperatures of each One. In this case, storage has the possibility of the coldest temperature and transport has the possibility of the hottest. The three bars are totally product dependent and you should know these limits before you start testing.
Some products are built to withstand high temperatures, like many automotive or avionics products. I chose this example because there is a large difference between the operating temperature and those that are not always paid as much attention to, especially storage. A good way to start your own testing is with a simple graph like the one above, even hand drawn, to make sure that you are capturing the full temperature range.
Real life examples
I worked with a company producing medical equipment that found their first failure at 2°C above room temperature. Their first reaction was to make excuses and to say that hospitals are always air conditioned. I let them know about an experience I had in a hospital where the heating system was controlled by the day of the year rather than the actual temperature. On September 1, all of the heaters turned on, even though the air conditioning should have been running based on temperature. The customer took corrective action and became the number one seller of that type of medical equipment throughout America.
One company that I have done a lot of testing for, has given their suppliers this rule of thumb: Tests must be run 25°C beyond the worst expected conditions and it is expected to go failure free 15°C on either side. In the chart above I used the 25° value. They wanted to make sure that there was plenty of cushion in the margins.
Another customer had no margins. Everything had to pass at 125°C. The choice of margin is completely up to you. Since you are doing a discovery test, you might as well discover everything that you can.
As alluded to the previous paragraph, you don't have to use preset margins. As you can see in the graph, the chamber temperature goes quite a way beyond the top and bottom temperatures. There is nothing wrong in taking something all the way to failure.
How to use your HALT results for HASS
For the uninitiated, what is the basic difference between HALT and HASS? The following table gives a very simple breakdown.
HALT
- Purposely take product to its failure limits
- Pre-production and prototype stage
- Step stress
- Product is never shipped to customer(Destructive test)
- A discovery test
- Typically one product at a time tested
- To test design marginality
HASS
- Take only the first product to its failure limits, then use that information to formulate screens
- Production stage
- Managed profiles
- All products passing can be shipped to customer (Non-destructive test)
- A pass / fail test
- Typically many items at a time tested
- To detect process shifts
HASS is a screening test using post production. The trick is finding the best levels to test at.
Some of the most important data points will be from your baseline tests - high temperature failure, low temperature failure and vibration level failure. There are often two levels of failure. The first, often called the operational limit (OL), is the point at which a product starts to show intermittent but recoverable failures. The second limit, from which there is no recovery, is the destruct limit (DL). There will be times when the operational limit and the destruct limit are the same. The first failure can also be the last. For temperature there is an upper and lower set of the OL and DL.
The following chart illustrates how you would use this information.
Rules of thumb:
- 80 to 85% of the OLs for temperature
- 50% of the DLs for vibration
- Three to five cycles
This profile shows the upper temperature as being within 20% of the upper operating limit (UOL) and the low temperature being with 20% of the lower operating limit (LOL). If vibration was being added at the same time it would be at half the destruct limit. (Remember that there is only a positive value for vibration since it cannot be less than 0.)
How do we do this with real numbers? It is a little trickier than it seems because you can't simply use the raw numbers but need to factor in the laboratory ambient temperature. For ease I have used 25°C for this example.
In this case we are ramping as quickly as possible to within about 5% of the upper destruct limit, dwelling long enough for a functional test and temperature stabilization, plunging to within about 5% of the lower destruct limit, running another functional test and allowing temperature stabilization, then quickly returning to room temperature. The next segment goes more slowly, ramp rates sometimes slowing to only 5°C/minute. This time we go back to 80 to 85% of the operating limits rule of thumb.
As in HALT, there is no one perfect way to run the testing. Knowing your product and its likely reactions in invaluable, as is the follow up analysis.
Double check system
Let's say that you have got your HASS profile all set, are running product through, and almost never see a failure. You want a way to double check the tests to make sure that they are not allowing possibly failure prone products to slip through. How can you do it?
Simple. Choose a small lot of products and run your profile over and over again until you start to see failures. For instance, using the traditional profile, say that you can run it 100 times before you start seeing failures. Since the goal is to remove only 5% of the useful life, that would allow you to calculate out that 5 cycles should be sufficient to test the product but still leave plenty of useful life. If you are not finding many failures during test, and correspondingly few in the field, you simply have a nicely robust product. The problem is if you have low failure rates during testing but high rates in the field.
In this second case you may need to go back and do a HALT again to get new baselines. Do a failure analysis to see if some unthought-of stress is being applied in the field. Then make sure that your screen is really putting enough stress on the process and that your profile has not been built simply to have a high passing rate.
Enjoy yourself
You have the chance to plan out an experiment, to be surprised at a few findings and to make a difference. With good preparation, learning from others' mistakes, good failure analysis and an open mind throughout the process, you have a chance to work and play at the same time.
I wish you the very best with your testing.